

Posted by Editorial Team on Nov 01, 2026
How to Identify a Wheel Cover Model by Its Design and Markings
Quick Summary
To identify a wheel cover model, start with the wheel diameter, which is the number after the R in the tire size code such as P215/65R16. Then count the lug nuts, measure the bolt pattern across opposite lug holes, and note the attachment style and spoke count. Photograph the front and back, and check for molded part numbers.
- The number after the R in the tire code gives the wheel diameter in inches.
- Count the lug nuts and measure the bolt pattern center to center across opposite holes.
- Two covers of the same diameter can attach differently, so check clips or lug mounting.
- Count the spokes and note the center design and finish before comparing catalogs.
- Confirm trim level and wheel option, since the same model year can use different wheels.
Table of Contents
- Start With What You Have: Wheel Cover Terms and Types
- Read the Tire Size to Find the Wheel Diameter
- Check Bolt Pattern, Lug Nuts and Attachment Style
- Find the Part Number and Molded Markings
- Identify a Wheel Cover by Its Design and Spoke Pattern
- Identify a Wheel Cover by Photo: A Repeatable Workflow
- Match the Cover to Your Vehicle by Make, Model and Year
- Verify Fit Across Trims and Model Years
- Order a Confirmed Match From WheelCovers.Com
- Frequently Asked Questions
Start With What You Have: Wheel Cover Terms and Types
Last Updated: November 1, 2026
Before you can identify a wheel cover model, you need to know what you're looking at. Questions like this often start with a mix-up over names. People use "hubcap," "wheel cover," "wheel skin," and "center cap" to mean different things, and that confusion makes it harder to search for the right part.
A wheel cover is a decorative shell that fits over the steel wheel and covers the wheel face. A hubcap is an older term that usually refers to the same kind of full cover. A center cap is smaller and only covers the middle of the wheel, where the lug nuts sit. A wheel skin is a thin, often plastic or aluminum cover that follows the wheel's shape more closely.
Knowing which type you have narrows the search quickly. A full cover with spokes is a different product from a center cap with a logo, even if both sit on the same car.
Here are the terms you will see most often:
- Hubcap: A full cover for a steel wheel, often used on older cars.
- Wheel cover: The general term for a full cover, including designs with spokes or a solid face.
- Center cap: A small cover that sits in the middle of the wheel.
- Wheel skin: A thin cover that fits closely to the wheel's shape.
- Trim ring: A ring that goes around the wheel's outer edge.
Most covers fall into a few broad groups. Some have a solid face, some have spokes, and some use a central emblem. Others are designed for alloy wheels and attach differently. Start by deciding which group your cover belongs to. That step alone makes the rest of the identification process far simpler.
Read the Tire Size to Find the Wheel Diameter
The fastest way to narrow down a wheel cover is to find the wheel diameter. Most people look at the tire first, because the tire size tells you the wheel size.
Check the sidewall of your tire. You will see a code like P215/65R16. The number after the "R" is the wheel diameter in inches. In this example, the wheel is 16 inches across.
Here is how to read the common parts of that code:
- 215: Tire width in millimeters.
- 65: Sidewall height as a percentage of the width.
- R: Radial construction.
- 16: Wheel diameter in inches.
Many drivers mix up tire width with wheel size. The 215 is not the wheel size, and neither is the 65. Only the number after the "R" tells you the diameter you need for a wheel cover.
Keep in mind that the tire is only a starting point. A cover that matches a 16-inch wheel still needs to fit the correct bolt pattern and attachment style. Use the diameter to shrink your options, then check the other details before you order.
If you find a cover with no tire to check, measure the wheel across its face at the widest point, from one edge of the rim to the opposite edge. Measuring from bead to bead is more accurate than guessing from the cover's outside edge.
The key numbers for finding your wheel size are summarised below.
| Code part | What it means | Example |
|---|---|---|
| 215 | Tire width in millimeters | 215 mm |
| 65 | Sidewall height as a percentage of width | 65% |
| R | Radial construction | Radial |
| 16 | Wheel diameter in inches | 16 inches |
Check Bolt Pattern, Lug Nuts and Attachment Style
A wheel cover can match the right diameter and still fail to fit. The bolt pattern and attachment style decide whether it will sit flat and stay on. This is also the step where most identification mistakes happen, because two covers can share a diameter and a spoke count and still mount in completely different ways.
Count the lugs first
Count the lug nuts on the wheel. Most passenger cars use 4, 5, or 6; some trucks and larger SUVs use 8. The count is the first half of the bolt pattern. Write it down before you measure anything.
Measure the bolt pattern correctly
The bolt pattern, sometimes called the PCD or pitch circle diameter, is the diameter of the circle the lug holes sit on. How you measure depends on the lug count, and this is where people go wrong:
- 4 lugs: Measure from the center of one lug hole straight across to the center of the opposite hole.
- 6 lugs: Same method, center of one hole to the center of the hole directly opposite.
- 8 lugs: Same method again, straight across to the opposite hole.
- 5 lugs: There is no hole directly opposite.
Measure in millimeters for metric patterns and in inches for older domestic patterns, and record both if you are unsure. You can follow this step-by-step guide to measure the wheel bolt pattern for any lug count. A pattern written as 5 x 114.3 mm is the same as 5 x 4.5 inches; the two are interchangeable, and catalogs list them both ways.
Common patterns you will run into:
- 4 lugs: 4 x 100 mm, 4 x 4.25 in
- 5 lugs: 5 x 100 mm, 5 x 114.3 mm (5 x 4.5 in), 5 x 120 mm
- 6 lugs: 6 x 139.7 mm (6 x 5.5 in)
- 8 lugs: 8 x 165.1 mm (8 x 6.5 in)
Treat these as starting points, not a lookup table. To understand PCD and choose the right cover, see how to identify your lug nut pattern for hubcap fitment. Plenty of vehicles use a pattern that is not on any short list, so measure your own wheel rather than assuming.
Identify the attachment style
Next, look at how the cover attaches. The common styles are:
- Clip-on: Metal or plastic clips grip the wheel's outer rim lip. Count the clips and note their spacing, a 4-clip cover and a 6-clip cover for the same diameter are not interchangeable.
- Lug-nut mounted: The cover fits over or around the lug nuts, and the lug nuts themselves hold it on. Look for notches or recessed bolt holes in the back of the cover.
- Center-only: A small cap that presses into the center bore of the wheel. These are center caps, not full covers, and they are sized by the center bore diameter, not the wheel diameter.
- Retention ring: Some full covers use a separate steel ring that snaps into the rim and holds the cover. If your cover has a groove around its inner edge, it may be designed for a ring rather than clips.
Check the wheel side, not just the cover
If the cover uses clips, check the wheel's rim lip for the ridge the clips grab. A wheel with a rolled or stepped lip takes a different clip than a plain lip. If it uses lug-nut mounting, confirm the lug nuts are the type the cover expects, some covers seat on the nut's shoulder, others on a captured washer.
Do not assume that all covers with the same diameter use the same attachment. Two covers can both fit a 15-inch wheel and still attach in completely different ways. Attachment style is the second filter after diameter, and it eliminates more wrong matches than spoke count does.
Photograph the back of the cover with a ruler laid across the clip span. Clip-to-clip distance is a fast way to confirm a match when the part number is worn off.
Find the Part Number and Molded Markings
The part number is often the quickest way to confirm a model. Look carefully on the back of the cover, usually near the center or along the inner edge.
You may find:
- A stamped or molded number, such as a numeric code
- A manufacturer's mark or logo
- Date codes or production stamps
- Size or fitment markings, such as "15" or "16"
Clean the cover with mild soap and water first. Dirt and road grime can hide small markings. A soft brush can help with raised lettering, and a flashlight at a low angle can bring out embossed details.
Keep in mind that not every cover has a part number. Some older or aftermarket covers carry only a logo or a size mark. In those cases, you will need to rely on design and fitment details instead.
When you do find a number, write it down exactly. Small differences matter. A "7" and a "1" or a "3" and an "8" can change the whole model, so take a clear photo before you search.
Identify a Wheel Cover by Its Design and Spoke Pattern
Once you know the size and attachment, look at the face. The design is often the most visible clue, and it helps separate similar-looking covers.
Start with the overall shape. Note whether the cover is:
- Solid, with no openings
- Spoked, with a set number of openings
- Dished, with a raised or recessed center
- Styled with ribs, rings, or a machined look
Then count the spokes. Many covers have 5, 6, 8, or 10 spokes. Count them once, then count again. Spokes that look alike at a glance can differ in shape, width, or curve.
Check the center design next. Some covers have a logo, a plain cap, or a raised emblem. The center often tells you more about the model than the outer edge does.
Finally, note the finish. Chrome, painted silver, black, or two-tone designs can each point to different models or trim levels. Keep in mind that finish can fade or wear, so look at the underlying shape and markings too.
Write down what you see in a short list: diameter, spoke count, center type, finish, and attachment. That list makes it much easier to compare against a catalog or a fitment chart.
Identify a Wheel Cover by Photo: A Repeatable Workflow
If you can't match the cover with a catalog, a repeatable photo routine can help. Use the same steps each time so you capture the details that matter.
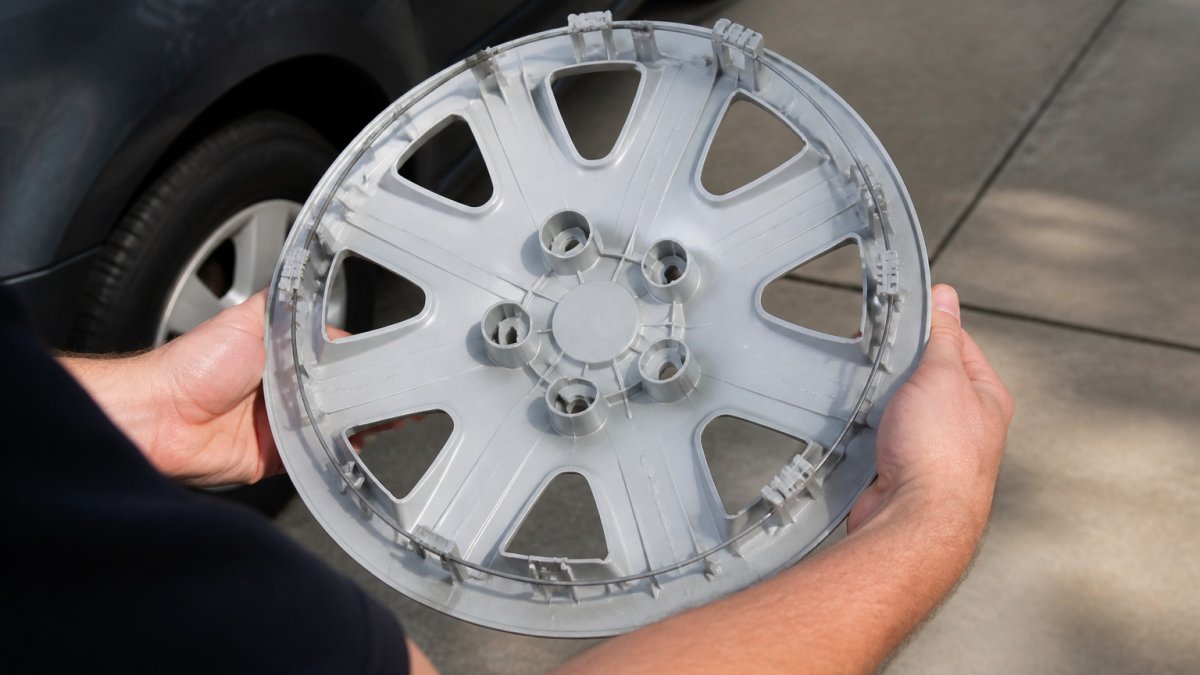
- Lay the cover on a flat, plain surface. Use a driveway or a table in daylight. Avoid heavy shadows.
- Photograph the front. Stand directly above the cover and take one straight-on shot.
- Photograph the back. Turn the cover over and capture the molded markings and clips.
- Take close-ups of any numbers or logos. Hold the camera close, with the lens parallel to the surface.
- Measure the diameter. Put a ruler across the face, bead to bead, and photograph it.
- Photograph the attachment points. Show the clips, tabs, or lug notches clearly.
Clear photos with a measuring tape in frame can help when you ask for help identifying a cover.
Some covers will still be hard to identify, since worn markings, paint, and dirt can hide details.
Match the Cover to Your Vehicle by Make, Model and Year
Once you have the size, attachment, and design, match the cover to the vehicle. Start with the make, model, and model year. Each of those narrows the list, but none of them is enough on its own. The gap most identification guides leave is the trim-and-option split: the same nameplate can carry two or three different wheel and cover combinations in a single model year.
Use the year range, not a single year
Many covers are designed for a window of years, not a single year. A cover listed for one model year may not fit the year before or after, even on the same car, because the wheel supplier or the wheel design changed mid-cycle. When a listing gives a range such as 2013-2018, treat the range as the fitment claim and confirm your year falls inside it.
Check the trim and the wheel option
Trim level is the most common reason a "correct" cover does not fit. A base trim and a sport trim can use different wheels, even when the car looks the same from the outside. The wheel option matters too: the same trim can be ordered with a standard steel wheel or an upgraded alloy wheel, and those take different covers.
Find the trim on your registration, owner's manual, or the car's window sticker. If the window sticker is gone, a dealer parts counter can usually decode the VIN and tell you which wheel option the vehicle was built with.
Watch for mid-year production splits
Automakers sometimes change a wheel design partway through a model year. Two cars with the same make, model, year, and trim can leave the factory with different wheels if they were built months apart. If a listing says "fits 2019" but your car was built late in the run, compare the actual wheel, not just the year.
A fitment checklist that catches the splits
Use this in order, and stop at the first mismatch:
- Confirm the make and model spelled exactly as listed
- Check the model year against the listing's year range
- Match the trim level if the listing names one
- Confirm the wheel option (steel vs. alloy) matches your wheel
- Compare the wheel diameter against the wheel itself, not the tire
- Verify the bolt pattern by counting lugs and measuring across them
- Confirm the attachment style and clip count
- Compare the cover's back side to your wheel's rim lip
The vehicle name is a filter, not a guarantee. Diameter, bolt pattern, attachment style, and trim/option all have to line up before a cover is a confirmed match. When a listing and your wheel disagree on any one of those, trust the wheel.
When the listing and the car disagree
If the fit is still unclear, take a photo of the wheel and the cover side by side. Seeing them next to each other can reveal differences in curve, clip position, or lug spacing that the listing did not show. Send that photo along with the VIN and the trim when you ask for help, the VIN is the fastest way for a specialist to confirm which wheel option the vehicle was built with.
Verify Fit Across Trims and Model Years
Even after you match the make, model, and year, check fit before you buy. Vehicles change during a production run. Wheel sizes, offsets, and hardware can shift between trims or updates.
Here are the checks we recommend:
- Compare the diameter against the wheel itself. Measure the wheel you have, not just the tire.
- Confirm the bolt pattern. Count the lugs and measure across them.
- Check the attachment method. Clips, lug mounts, and center caps are not interchangeable.
- Look at the clearance. Make sure the cover will not rub brake calipers or the inner fender.
- Review the photos. Compare the cover's back side to your wheel's rim lip.
Trim levels can change the wheel even on the same model and year. A sport trim may use a larger wheel with a different spoke design. A base model may use a steel wheel that needs a full cover. When in doubt, compare your wheel, not just the vehicle listing.
If the fit is still unclear, take a photo of the wheel and the cover side by side. Seeing them next to each other can reveal differences in curve, clip position, or lug spacing that the listing did not show.
Order a Confirmed Match From WheelCovers.Com
When you have the diameter, bolt pattern, attachment style, and design details, you can order with more confidence. Start on the WheelCovers.Com website and use the vehicle details you gathered to narrow the choices. Check the photos and measurements against your notes before you add anything to your cart.
Pricing depends on the product, quantity, and delivery options, so check WheelCovers.Com for current prices and availability. If you are not sure which cover fits, check WheelCovers.Com for contact options and current details.
WheelCovers.Com has been in business since 1979 and carries original and custom covers, along with wheel skins, wheel simulators, and trim rings.
Shop WheelCovers.Com with your measurements in hand, and you will be far more likely to order a cover that fits the first time.
Frequently Asked Questions
How do I find the model number on a wheel cover?
Look for a part number or molded code on the back of the cover, usually near the center or along the inner rim. Stamped numbers are often shallow and easier to read in angled daylight than under direct overhead light. Note the full string exactly, including letters and dashes, and compare it against the catalog or a seller's fitment lookup. If the cover has no marking, identify it by its diameter, spoke count, center design and attachment hardware, then confirm fit with the vehicle's year, make and model.
How can I tell what size wheel cover I need?
Read the tire size printed on the sidewall, such as P215/65R16. The number after the R is the wheel diameter in inches, here 16. Wheel diameter is not the same as tire size, so do not use the first number in the tire size. Measure the wheel itself if you can, and confirm the cover's listed diameter matches. Also check the bolt pattern and attachment style, since a correct diameter alone does not guarantee a secure fit.
How do I identify the correct wheel cover for my car?
Start with the vehicle's year, make, model and trim level, then match the wheel diameter and bolt pattern. Next, compare the spoke count, center emblem and attachment style with clear photos. Original equipment covers often carry a manufacturer logo or part number, which makes matching easier. When details are uncertain, compare the cover to the one on the car or to a reference image, and confirm fit before ordering.
Where is the part number on a hubcap or wheel cover?
Part numbers are usually molded or stamped on the back of the cover, sometimes near the valve stem opening or the center hub. Some covers place a number on a small label or along the outer edge. Clean the surface gently with a soft cloth so the marking is readable, and photograph it under indirect light. Record the exact characters, since a single digit difference can mean a different fitment.
