

Posted by Editorial Team on Oct 22, 2026
Center Cap for Wheels: Selection, Measurement & Installation
Last Updated: October 23, 2026
Quick Summary
A center cap for wheels is a protective cover that sits in the center of your wheel, covering the hub area while serving both aesthetic and functional purposes. It protects the wheel hub from dirt, moisture, and debris while giving your vehicle a finished, polished appearance.
- Measure the bore diameter at three points and use the smallest reading to ensure proper fit.
- Center caps come in snap-in and push-through styles; confirm your attachment style before ordering.
- A cap that matches bore diameter but is too tall will not seat properly in the wheel.
- Clean the hub area before installation and never use adhesive to secure a center cap.
- Universal caps work best as temporary solutions; measure your wheel for a permanent, custom-fit replacement.
Table of Contents
- What Is a Center Cap for Wheels and Why It Matters
- How to Measure Wheel Center Caps for Accurate Fitment
- Replacement Center Caps for Wheels: Finding Your Match
- Universal Wheel Center Caps: Compatibility and Limitations
- Center Cap Installation: Step-by-Step Instructions
- Identifying the Correct Replacement When the Original Is Missing
- Center Cap vs. Hubcap, Wheel Cover, and Hub-Centric Ring
- Maintenance, Cleaning, and Preventing Loss or Damage
- Frequently Asked Questions
What Is a Center Cap for Wheels and Why It Matters
A center cap for wheels is a protective cover that sits in the center of your wheel, covering the hub area. It serves both aesthetic and functional purposes: it protects the wheel hub from dirt, moisture, and debris while giving your vehicle a finished, polished appearance. Center caps come in various styles, materials, and finishes to match different wheel designs and vehicle types.
At WheelCovers.Com, we've helped thousands of vehicle owners find the right replacement center cap when theirs went missing or got damaged. A missing or damaged cap exposes the hub to rust, corrosion, and contamination that can compromise wheel integrity over time.
Center caps differ from hubcaps and wheel covers in important ways. While a hubcap covers just the center area, a wheel cover extends further to cover more of the wheel face. A center cap is specifically the circular cover that fits into the center bore. Understanding this distinction matters when you're shopping for replacements, because ordering the wrong type means wasted time and shipping costs.
How to Measure Wheel Center Caps for Accurate Fitment
Most center cap fitment failures trace back to one of three measurements taken wrong: the bore diameter, the cap's outer diameter at the retaining lip, or the depth available behind the wheel face. The workflow below covers all three so you order once.
Step 1: Measure the Bore Diameter Correctly
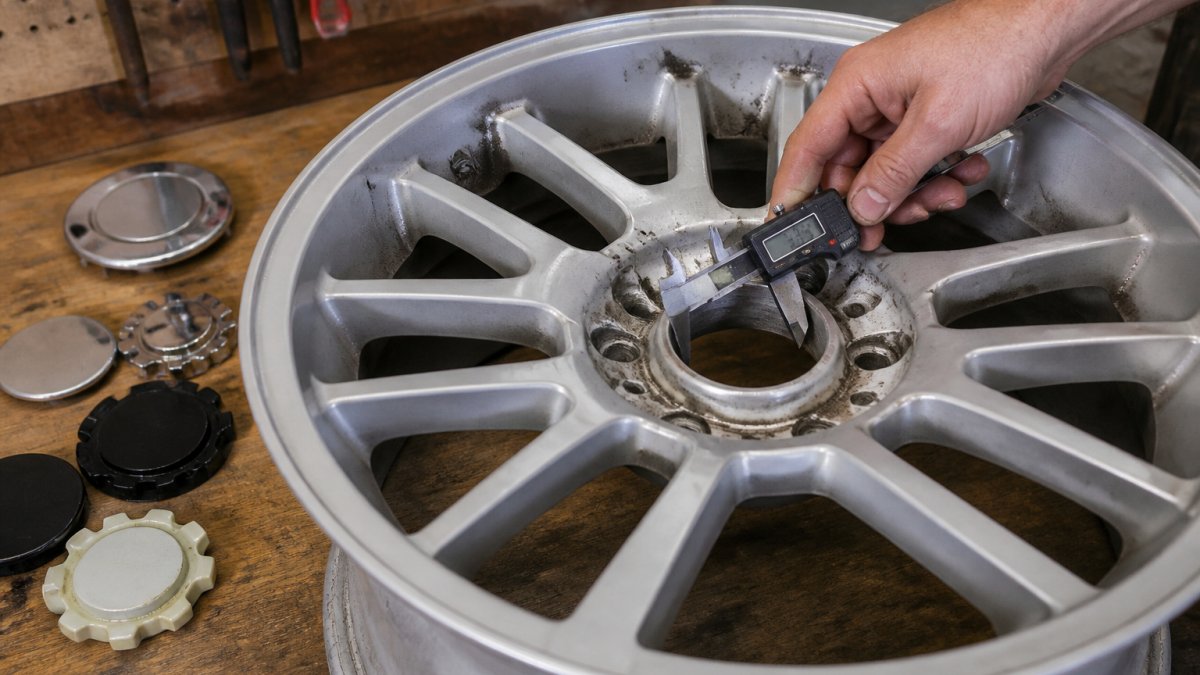
The bore is the circular opening in the center of the wheel where the cap seats. Measure the inside diameter of that opening, not the outside of the wheel face and not the diameter of the hub behind it.
- Park on level ground and chock the wheels. You do not need to remove the wheel for a bore measurement.
- Wipe the bore lip clean. Brake dust and road grime can add 1-2 mm of false reading.
- Use a caliper if you have one. A digital or dial caliper reads to 0.1 mm and is the most reliable tool for this job. A soft tape or steel ruler works but is easier to misread.
- Measure across the widest point of the opening at three positions roughly 120 degrees apart.
- Record each reading in millimeters. Convert to inches by dividing by 25.4 if a seller lists inches.
Use the smallest of your three readings as your working bore size. A cap must clear the tightest point of the bore; sizing to the largest reading is how buyers end up with a cap that will not seat. This is the opposite of the common advice to size up, and it is the single most useful correction to make before ordering.
If your measurement falls well outside that band, re-check that you measured the bore and not the hub pilot or the lug circle.
Step 2: Measure the Cap, Not Just the Hole
If you still have the original cap, measure it too. Three dimensions matter:
- Outer diameter at the face, the visible disc that sits proud of or flush with the wheel.
- Outer diameter at the retaining lip or clips, the part that actually grips the bore. This is usually 1-3 mm smaller than the face diameter on snap-in caps.
- Overall height, from the back of the clips to the top of the dome. Too tall and the cap bottoms out on the hub; too short and the clips never reach the groove.
A cap that matches your bore but is 5 mm too tall will not seat. A cap that matches in height but has clips sized for a different bore will rattle loose. Both dimensions have to match, which is why part-number lookup beats eyeballing whenever a number is available.
Step 3: Check the Depth Behind the Wheel Face
This is the measurement almost no guide covers. With the cap removed, look into the bore. You need to know:
- How deep the retaining groove or clip ledge sits below the wheel face.
- Whether the hub protrudes into the bore. On some wheels the hub face sits nearly flush with the bore opening, leaving very little room for a domed cap.
- Whether a hub-centric ring is present. If a metal or plastic ring is pressed into the bore, the cap seats against the ring, not the wheel, and you must measure the ring's inside diameter instead.
A dowel or depth gauge works here. Measure from the wheel face down to the retaining ledge and write it down. If a seller lists cap height, compare it to this depth plus 2-3 mm of clearance.
Step 4: Confirm the Attachment Style Before You Order
Size alone does not guarantee fit. The two common attachment styles behave differently:
- Snap-in (clip-in) caps have flexible tabs on the back that catch a groove or ledge in the bore. They are the dominant style on modern alloy wheels because the clips provide a mechanical lock.
- Push-through caps rely on friction against the bore wall, sometimes with a separate retaining ring. They are common on older designs and some steel wheels.
Look at the back of your existing cap. Visible tabs or clips mean snap-in. A smooth skirt means push-through. If the cap is gone, the wheel itself usually tells you: a machined groove just inside the bore points to snap-in, while a plain tapered bore points to push-through.
Quick Fitment Checklist
- Bore measured at three points, smallest reading used
- Cap face diameter and clip diameter both recorded
- Cap height compared to bore depth plus clearance
- Hub-centric ring presence checked
- Attachment style confirmed from the old cap or the bore profile
- Measurements recorded in both millimeters and inches
If any of these is unknown, do not order yet. A five-minute measurement session prevents the most common return reason for center caps: a cap that is the right diameter but the wrong depth or attachment style.
Replacement Center Caps for Wheels: Finding Your Match
Once you know your wheel's bore size and attachment style, you can start looking for a replacement. The market offers both OEM (original equipment manufacturer) caps and aftermarket alternatives, each with different benefits.
OEM vs. Aftermarket Options
OEM center caps are manufactured by your vehicle's original maker or an authorized supplier. These caps match your wheel's original design precisely and are guaranteed to fit correctly. They maintain the factory appearance and finish of your wheels. The trade-off is that OEM caps may require ordering through a dealership, which takes longer.
Aftermarket center caps come from third-party manufacturers and offer more variety in style and finish. Many aftermarket options offer a variety of styles and finishes. Aftermarket caps give you the flexibility to customize your wheel appearance, you can choose different finishes, colors, or designs that complement your vehicle's style. The key is ensuring the aftermarket cap matches your wheel's bore size and attachment style.
At WheelCovers.Com, we stock both OEM and aftermarket options across our inventory of over 1 million wheel accessories. Whether you need an exact factory replacement or want to upgrade to a custom finish, you'll find options that fit your specific vehicle and budget.
Style and Finish Considerations
Center caps come in several visual styles. Open-center caps have a recessed or sunken design that creates visual depth on your wheel. Closed-center caps have a domed or flat top that presents a complete, solid appearance. Some caps feature the vehicle brand's logo or emblem, while others are plain or feature custom designs.
Finish options include polished aluminum, matte black, chrome, textured finishes, and custom colors. A polished finish reflects light and gives wheels a premium appearance. Matte or textured finishes hide fingerprints and dust better than polished options. Chrome finishes offer a classic, high-shine look but require more frequent cleaning to maintain their appearance.
Consider your wheel's existing finish when choosing a replacement center cap. A polished cap on a matte wheel looks out of place, and vice versa. Match the finish to your wheel's overall aesthetic for a cohesive look.
Universal Wheel Center Caps: Compatibility and Limitations
Universal center caps are designed to fit many wheel sizes and styles. They typically come with adjustable clips or flexible attachment mechanisms that accommodate bore diameters within a certain range, often 55mm to 75mm or 65mm to 85mm, depending on the product.
Universal caps offer convenience compared to vehicle-specific options. They're useful when you don't know your exact wheel specifications or need a quick temporary solution. However, they have real limitations. A universal cap sized for a 70mm bore may fit a 68mm bore loosely or won't seat properly on a 75mm bore.
For a permanent solution, we recommend measuring your wheel and ordering a cap designed specifically for your bore size. Universal caps work best as temporary replacements while you source the correct size. If you're uncertain about your measurements, WheelCovers.Com's team can help you identify the right cap for your vehicle using your vehicle's year, make, and model.
Center Cap Installation: Step-by-Step Instructions
Installing a center cap is straightforward once you have the correct size and style. The process takes just a few minutes and requires no special tools.
Push-Through and Snap-In Installation
For push-through caps:
- Clean the wheel hub area with a dry cloth to remove any dirt or debris
- Align the cap with the center opening
- Push firmly and straight into the center bore until it seats fully
- The cap should sit flush with the wheel surface with no gaps
For snap-in caps:
- Clean the wheel hub opening thoroughly
- Position the cap so the clips or tabs align with the grooves or slots in the wheel's center bore
- Press the cap straight in while slightly twisting clockwise or counterclockwise, depending on your cap's design
- Push until you feel the clips catch and lock into place
- The cap should be secure and not move when you apply gentle pressure
Test the installation by gently pulling on the cap. It should not move or wiggle. If it does, remove it and check that you're using the correct size and that the attachment clips are properly seated.
Common Installation Mistakes to Avoid
The most common mistake is forcing a cap that doesn't fit. If a cap doesn't slide in smoothly or requires excessive force, stop immediately. Forcing an incorrectly-sized cap can crack the cap, damage the wheel's center bore, or both. Remove it and verify your measurements.
Another frequent error is installing a cap at an angle. Always push straight into the center, perpendicular to the wheel. Angled installation can cause the cap to seat unevenly and pop off during driving.
Failing to clean the hub area before installation is also problematic. Dirt and debris prevent proper seating and can scratch the cap or wheel. Wipe the hub clean with a dry cloth before installing.
Identifying the Correct Replacement When the Original Is Missing
When the original cap is gone, you cannot compare against it, and that is where most buyers get stuck. The workflow below moves from the easiest identifier to the hardest, then covers the troubleshooting cases that product listings never address.
Step 1: Start With the Vehicle, Then Narrow to the Wheel
Year, make, model, and trim are the starting point, not the answer. The same model year often shipped with two or three different wheel designs across trims, and each design can use a different cap. Record:
- Year, make, model, and trim
- Wheel diameter and width (stamped on the tire sidewall or the wheel)
- Whether the wheels are the factory originals or an aftermarket set
If the wheels are aftermarket, vehicle information will not identify the cap. Go straight to the wheel markings.
Step 2: Read the Wheel Markings
Remove the wheel if you can, or use a mirror and light. Look for markings on the back of the spokes or the hub pad. You are looking for:
- A part number stamped or cast into the wheel
- A manufacturer name or logo
- A bore size or fitment code
- A date or production code
A wheel part number plus the vehicle information is usually enough for a supplier to pull the exact cap. Photograph every marking you find, including ones you cannot read, and send the photos with your inquiry. Cast numbers are often faint and photograph better than they read by eye.
Step 3: Use the Other Three Wheels
If three caps remain, you have a reference set. Measure one cap's face diameter, clip diameter, and height, and note the finish, logo, and any part number molded into the back. A part number on the back of a surviving cap is the fastest path to an exact replacement. Even without a number, the three measurements plus a photo will let a supplier match the cap to the wheel.
Step 4: Troubleshoot the Fit Before You Reorder
If you already bought a cap and it will not seat or will not stay on, the problem is usually one of the following. Diagnose before ordering again.
The cap will not go in at all. The cap's clip diameter is larger than the bore's smallest reading. Re-measure the bore at three points and compare to the cap's clip diameter, not its face diameter.
The cap goes in but sits proud or bottoms out. The cap is too tall for the available bore depth, or the hub protrudes into the bore.
The cap seats but pops off while driving. The clips are not engaging the groove.
The cap spins freely but will not lock. The clip pattern does not match the groove pattern. Some caps index to specific slots; a cap with the wrong clip count or spacing will rotate without catching.
The cap fits one wheel but not another. Aftermarket wheels on the same vehicle can have different bore sizes. Measure each wheel individually rather than assuming they match.
Step 5: Confirm Before You Buy
Send the supplier your vehicle information, wheel part number or photos of the markings, the three cap measurements from a surviving cap if you have one, and the bore measurement. A supplier who can confirm fitment against those inputs will save you a return. If a listing only offers a diameter and no attachment style or height, treat it as a guess.
Center Cap vs. Hubcap, Wheel Cover, and Hub-Centric Ring
These terms are often used interchangeably, but they describe different products with different purposes.
A center cap for wheels covers just the center hub area, typically 50-90mm in diameter. It's a small, focused component that protects the wheel's center bore and hub.
A hubcap is a larger cover that extends further across the wheel face, often covering the lug nuts and more of the wheel's visible surface. Hubcaps are common on older vehicles and steel wheel setups.
A wheel cover is the largest of the three, covering most or all of the wheel face.
A hub-centric ring is not a cap at all, it's a metal ring that sits between the wheel and the vehicle's hub to ensure proper centering.
Understanding these distinctions matters when ordering replacements. Ordering a full wheel cover when you need a center cap, or vice versa, means sending back your order and starting over. Confirm what you actually need before purchasing.
Maintenance, Cleaning, and Preventing Loss or Damage
A well-maintained center cap lasts for years. Regular cleaning keeps it looking good and helps you spot damage early.
Clean your center caps every two to four weeks using warm soapy water and a soft cloth. For stubborn dirt or brake dust, use a soft brush or microfiber cloth. Dry immediately with a clean cloth to prevent water spots. Avoid abrasive cleaners or scouring pads, which can scratch polished or chrome finishes.
Inspect your caps regularly during cleaning. Look for cracks, loose clips, or signs that a cap is starting to lift. Catching these issues early prevents caps from falling off during driving.
To prevent loss, ensure your caps are properly installed and seated fully. Check them after long drives, especially on rough roads where vibration can loosen components.
Protect your caps from damage by avoiding curb contact and rough handling. When parking near curbs, be cautious, caps can be damaged if wheels strike objects.
In winter conditions with road salt, check your caps more frequently. Salt accelerates corrosion of metal components underneath, and caps that sit loose allow salt water to penetrate.
Finding the right center cap for wheels requires knowing your wheel's bore size, attachment style, and desired finish. With accurate measurements and clear information about your vehicle, you can order with confidence and install your new cap in minutes.
Frequently Asked Questions
How are wheel center caps measured?
Measure the hub bore diameter, the opening at the wheel's center, using a ruler or measuring tape. Place the ruler across the center bore and note the diameter in millimeters or inches. Also check the attachment style (push-through or snap-in) and any retaining clips. Accurate measurement ensures your replacement center cap fits securely and looks correct on your wheel.
Are wheel center caps universal?
Most center caps are vehicle-specific due to varying hub diameters and attachment styles. Universal wheel center caps exist but typically fit only a limited range of bore sizes. For the best fit and appearance, identify your vehicle's exact specifications, make, model, and year, to find a direct-fit replacement rather than relying on universal options.
How do I install a replacement wheel center cap?
For push-through caps, align the cap with the wheel opening and press firmly until it seats. For snap-in caps, position the cap and press the retaining clips into the wheel's slots. Ensure the cap is centered and flush with the wheel surface. If the cap resists, verify you have the correct bore size and attachment style before forcing it.
What's the difference between a center cap and a hubcap?
A center cap covers only the wheel hub's center bore, while a hubcap covers the entire wheel center and lug nuts. Center caps are smaller and more decorative, protecting the hub from dust and debris. Hubcaps offer broader coverage and are common on older vehicles. Wheel covers are larger still, covering the full wheel face. Choose based on your vehicle's design and your aesthetic preference.
