

Posted by Editorial Team on Nov 01, 2026
Autozone Hub Cap Options and How to Find the Right Fit
Last Updated: November 1, 2026
Quick Summary
A hub cap is a wheel cover that spans nearly the entire wheel face, hiding the steel wheel and lug nuts, while a center cap is a small piece covering only the hub opening. To find the right fit, measure the wheel diameter, identify the attachment style, and match the vehicle's year, make and model.
- Measure the wheel diameter across the inner rim edges, not the tire sidewall.
- Full wheel covers hide the whole wheel face; center caps cover only the middle hub opening.
- Clip-on covers need an inner rim lip; push-on covers need an undamaged outer edge.
- Check the back of the old cover for its clip or tab pattern before shopping.
- A single missing cover can often be replaced without replacing the whole set.
Table of Contents
- Why Hub Caps Get Lost and What You Can Replace
- Hubcaps vs. Center Caps: Knowing Which Part You Need
- How to Measure Wheel Covers Before You Buy
- Finding Replacement Hubcaps by Vehicle
- Push-On, Snap-On and Clip-On Attachment Styles Compared
- Wheel Cover Installation Step by Step
- Troubleshooting Covers That Pop Off or Won't Stay On
- Durability, Materials and Real-World Trade-Offs
- Ordering Your Hub Cap Online and Checking Availability
- Frequently Asked Questions
Why Hub Caps Get Lost and What You Can Replace
Hub caps and wheel covers usually disappear for ordinary reasons: a curb strike, a pothole at highway speed, or a set of lug nuts that never got fully tightened. Once one cap is gone, the rest of the set starts to look mismatched, and many owners go looking for a replacement right away.
The good news is that a single missing cover is rarely a reason to replace the whole set. Most drivers can match a replacement to what remains, provided they know the vehicle's year, make and model and the wheel size. Replacement options exist for many common vehicles, so check available listings before giving up on the set.
Hubcaps vs. Center Caps: Knowing Which Part You Need
The three products sold under this search term are not interchangeable, and mixing them up is the single most common reason a replacement does not fit. Here is the distinction that matters before you order.
Full wheel cover. A full cover spans nearly the entire wheel face, from the outer rim edge across the center. It hides the steel wheel, the lug nuts, and the valve stem opening (most designs include a cutout for the stem). If your wheel currently has a large disc that covers everything, you need a full wheel cover. You can shop for a used Cadillac Deville, DTS OEM center cap in chrome that matches genuine GM styling.
Hub cap. In everyday use, "hub cap" is often used as a synonym for a full wheel cover. Treat the word as a category label, not a size specification, and confirm the actual coverage from the product photo and dimensions.
Center cap. A center cap is small, typically 2 to 4 inches across, and covers only the hub opening in the middle of the wheel, around the lug nut area. It is common on alloy wheels where the spokes are exposed and only the center bore needs dressing. A center cap will not cover a steel wheel, and a full cover will not seat on an alloy wheel designed for a center cap.
How to identify what is on your wheel
- Look at how much of the wheel is covered. Full face covered: full wheel cover. Only a small circle in the middle: center cap.
- Check the back of the part if you still have it. Full covers have a ring of clips or tabs around the outer circumference; center caps usually have three or four small prongs or a threaded collar.
- Note the wheel type. Steel wheels with exposed lug nuts almost always take a full cover. Alloy wheels with visible spokes usually take a center cap.
- Measure the outer diameter of the part you are replacing, not the wheel, if you have the old piece in hand.
If you are unsure which category your wheel uses, describe the wheel and the old part to the seller before ordering, a two-minute check beats a return.
How to Measure Wheel Covers Before You Buy
A cover that is one size off will not seat, and a cover with the wrong retention style will seat and then leave. Work through this checklist in order and write each number down before you browse.
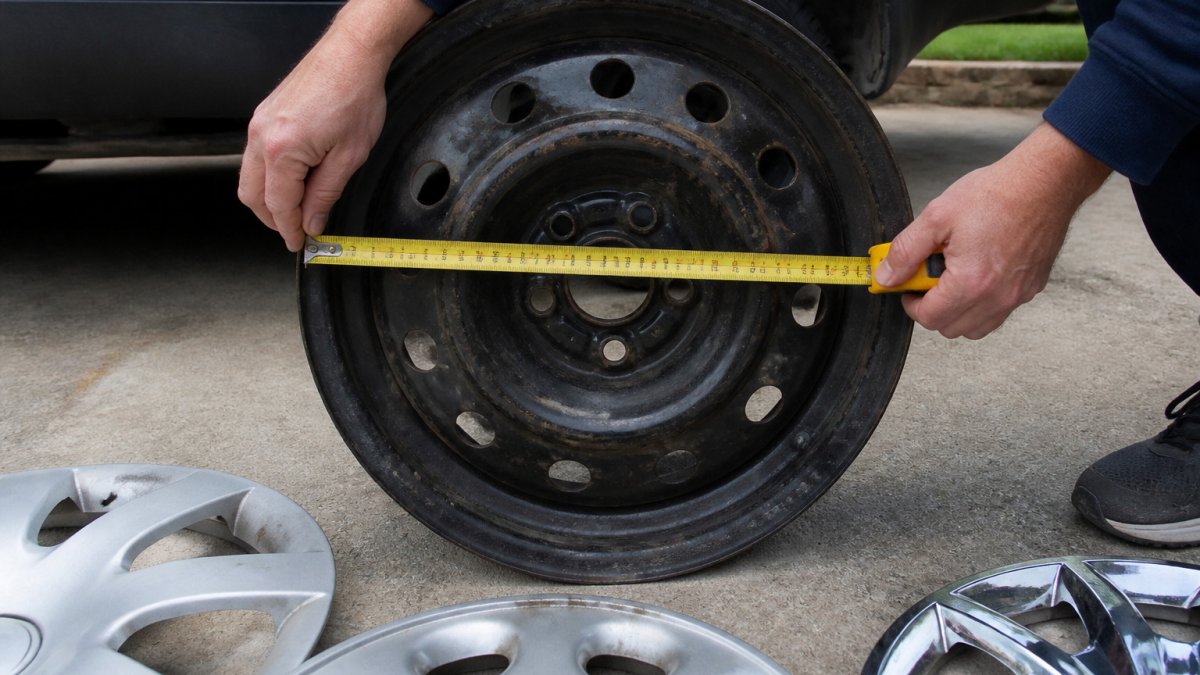
1. Measure the wheel diameter, not the tire
Use a tape measure across the wheel face from the inner edge of the rim to the opposite inner edge, passing through the center. Record the result in inches, American wheel sizes are listed in inches, and common passenger-car sizes run from about 13 to 17 inches, with larger sizes on trucks and SUVs. Do not measure the tire sidewall; that number will be several inches too large.
2. Measure the center bore if you are buying a center cap
The center bore is the opening in the middle of the wheel where the cap seats. Measure across the opening and record it to the nearest eighth of an inch. The cap's retaining prongs or collar must match this opening, not the wheel diameter.
3. Identify the retention style
Look at the back of the old cover or at the wheel lip:
- Push-on / snap-on: a continuous ring or tabs that press over the outer rim edge. Common on steel wheels.
- Clip-on: individual spring clips around the circumference that grab the inner lip of the rim.
- Bolt-on / threaded: a center cap that threads or bolts into the hub opening. Common on alloy wheels.
A clip-on cover will not hold on a wheel with no inner lip, and a push-on cover will not grip a wheel with a damaged outer edge. Match the style to the wheel, not just the diameter.
4. Confirm the lug pattern and vehicle details
Record the vehicle's year, make, model, and trim from the registration or door-jamb sticker. If the vehicle was offered with more than one wheel option, note the lug count and bolt pattern (for example, 5 lugs on a 4.5-inch circle) so you can cross-check the listing. Model years often change mid-generation, so a cover listed for a range may not fit every year in that range.
5. Compare the photo and spoke count
Lay the listing photo next to a photo of your existing cover. Match the spoke count, the finish (chrome-look, gloss black, machined silver), and whether the design is a solid disc or an open-spoke pattern. A correct diameter with the wrong spoke count will look mismatched even though it fits.
With the diameter, bore, retention style, lug pattern, and vehicle details written down, you can filter listings quickly and rule out most wrong-fit orders before they ship.
Finding Replacement Hubcaps by Vehicle
Start with the year, make and model of your vehicle. Most replacement listings are organized by these fields, and a wrong year can mean a cap with a different clip position or wheel size. If your car was sold with different wheel options across trim levels, confirm the trim too.
Checking Year, Make and Model Compatibility
Compare the listing's stated fitment against your registration or the door-jamb sticker. To browse the full range, shop center caps by vehicle. Model years often change mid-generation, so a cap listed for "2015 to 2017" may not fit a 2014 with the same nameplate. When in doubt, call or message before ordering, since the wrong size is the most common reason covers come back.
Matching Finish, Spoke Count and Style
Finish and spoke count matter for appearance. A buyer's guide to matching hubcap styles and sizes walks through the choices. A six-spoke chrome cover will look wrong on a ten-spoke gloss black wheel, even if the diameter is correct. Look at a clear photo of your existing cover and note the spoke count, the finish, and whether the design is a solid disc or an open spoke pattern.
Push-On, Snap-On and Clip-On Attachment Styles Compared
Attachment style decides how the cover stays on. Push-on covers rely on pressure to seat over the rim and usually need a firm tap to lock into place. Snap-on covers use a tab or ring to click over the wheel edge, and clip-on covers hold through spring clips that grab the wheel's inner lip.
Match the attachment style to your wheel design, since a clip-on cover will not hold on a wheel with no inner lip.
Wheel Cover Installation Step by Step
Start with a clean wheel. Dirt and road grit under the cover can cause scratches and loosen the fit over time. Set the cover on the wheel face with the logo or emblem in the position you want.
Next, align the cover with the valve stem opening if the design has one, then press firmly around the edge until the clips or tabs engage. Work your way around the circle, pressing at each point, rather than pushing on one side only. Finish by checking that every clip is seated and the cover does not rock when you press on it.
Troubleshooting Covers That Pop Off or Won't Stay On
Most cover failures come from one of three causes: the wrong size, a damaged clip, or a wheel with no secure lip to grip. Start by confirming the diameter and attachment style match your wheel. If the fit is correct, inspect the clips for bends or cracks, since a single weak clip can let the whole cover work loose.
Dirt, road salt and worn spring clips also contribute to covers popping off. Clean the wheel and clips, and replace any clip that no longer grips firmly. A cover that keeps coming loose on the same side often has a bent clip on that side.
Durability, Materials and Real-World Trade-Offs
Most wheel covers are made from plastic or painted metal, and the material you choose affects how well the finish holds up. Automotive-grade ABS plastic handles temperature swings and road debris reasonably well, while cheaper plastics can crack or fade after a few seasons of heat and sun.
There are trade-offs. Chrome-look finishes look sharp when new but show scratches and fading sooner than gloss black. Open-spoke designs look bold but collect more road grime. Metal covers cost more and weigh more, but hold up better to impact. Choose based on how the car is used and how much wear you expect.
The table below summarises the material and finish trade-offs covered in this section.
| Option | Best for | Key difference |
|---|---|---|
| Automotive-grade ABS plastic | Everyday driving | Handles temperature swings and debris reasonably well |
| Cheaper plastics | Short-term use | Can crack or fade after a few seasons |
| Chrome-look finish | Showy appearance | Looks sharp new but shows scratches and fading sooner |
| Gloss black finish | Lower visible wear | Holds up better than chrome-look over time |
| Open-spoke design | Bold look | Collects more road grime |
| Metal cover | Impact resistance | Costs more and weighs more |
Ordering Your Hub Cap Online and Checking Availability
Start by searching with your vehicle's year, make, and model, then filter for the wheel diameter and attachment style you measured. Check the photo against your existing cover, read the fitment notes, and confirm the number of covers in the listing.
Before you buy, check current stock and delivery details for the item on WheelCovers.Com. If you have questions about fitment, contact the team before ordering to avoid a return.
Frequently Asked Questions
Does AutoZone sell wheel covers?
Before you order any replacement, confirm the listing matches your exact year, make and model, and compare the part's diameter and attachment style with your current cover. For a broader selection of replacement hubcaps and wheel covers, you can review the WheelCovers.Com catalog before purchasing.
How do you measure wheel hub caps?
Measure the outside diameter of your existing wheel cover or the wheel's visible face, typically from edge to edge across the center. Then check the cover's inside diameter, which is the part that sits against the wheel, and confirm it matches your wheel's lug pattern and center bore. Note whether your cover snaps on, pushes on or clips to the wheel's rim. Write these figures down and match them against the product specifications before ordering.
Are wheel covers and hubcaps the same thing?
Not exactly. Hubcaps usually refer to the larger decorative covers that fit over the entire steel wheel, while wheel covers can describe a broader category that includes full-face covers and styled replacements. Center caps are smaller pieces that fit only the middle of the wheel. Knowing which type your vehicle uses makes it easier to search for the correct part and avoid buying a cover that is too small or the wrong shape.
How do you install a replacement wheel cover?
Start with the wheel cool and the car parked on level ground. Align the cover's inner edge with the steel rim, then press firmly around the circumference until the clips or tabs seat. For push-on styles, tap the edges evenly with the heel of your hand. For snap-on styles, make sure the retaining ring is fully engaged. Check that the cover sits flush and doesn't wobble when you press the edge. Recheck after a few days of driving, since a cover that seated loosely can work its way off.
