

Posted by Editorial Team on Oct 13, 2026
Aftermarket Wheel Cover Compatibility Risks: 2026 Guide
Table of Contents
- Why Aftermarket Wheel Cover Compatibility Risks Matter
- Aftermarket vs OEM Wheel Covers: Where Fitment Goes Wrong
- Wheel Cover Size Guide: Match Diameter, Profile, and Wheel Design
- How to Measure a Wheel for a Wheel Cover Before You Order
- Wheel Cover Retention Clips and Attachment Design Risks
- Wheel Cover Clearance and Valve Stem Compatibility Checks
- Wheel Covers vs Replacement Rims: Pros, Cons, and When to Switch
- Wheel and Tire Protection: What Covers Help and Hurt
- Troubleshooting Loose Covers, Noise, and Sensor Interference After Install
- Conclusion: Lowering Aftermarket Wheel Cover Compatibility Risks
- Frequently Asked Questions
Last Updated: October 13, 2026
Why Aftermarket Wheel Cover Compatibility Risks Matter
Aftermarket wheel cover compatibility risks are the fitment, retention, and clearance problems that cause a replacement cover to sit loose, rub, or fall off a wheel it was never designed for. At WheelCovers.Com, we have spent nearly 50 years matching covers to wheels, and most failures trace back to one skipped measurement. A cover that looks right in a photo can still be the wrong diameter, the wrong profile, or the wrong attachment type for your rim.
Here is the core problem. Aftermarket covers are built to fit a range of wheels, not one exact rim. That flexibility is what makes them affordable. It is also what creates risk.
The good news: nearly every compatibility failure is predictable before you order. This guide walks through the specific checks that catch bad fits early, from measuring your wheel to testing clearance around the valve stem and brake hardware.
Aftermarket vs OEM Wheel Covers: Where Fitment Goes Wrong
An OEM wheel cover is built to one specification for one wheel. An aftermarket cover is built to fit many wheels in a size class. That single difference explains almost every fitment complaint.
OEM covers match the factory wheel's exact diameter, clip positions, and profile. Aftermarket covers use a more universal design so one part number can serve several model years. The trade-off is real.
Where fitment goes wrong:
- Diameter drift. A cover made for a 15-inch wheel may fit a 15-inch rim from one maker and sit loose on another.
- Profile mismatch. Steel wheels and alloy wheels have different outer lips. A cover designed for steel can wobble on alloy.
- Clip placement. Factory clips land in specific spots. Universal clips may not reach the same contact points.
- Offset differences. Wheels that sit further in or out change how the cover's edge meets the tire.
The fix is not to buy the most expensive cover. It is to confirm the cover was designed for your wheel's exact configuration before you order.
NHTSA guidance on vehicle equipment and safety
Wheel Cover Size Guide: Match Diameter, Profile, and Wheel Design
A wheel cover size guide comes down to three numbers and one shape: outer wheel diameter, wheel profile, and the wheel's design style. Get all four right and the cover seats properly. Miss one and you get a loose or noisy fit.
Start with diameter. Wheel covers are sized by the wheel's outer rim diameter, not the tire. A tire marked 225/60R16 sits on a 16-inch wheel, so you need a 16-inch cover. The tire number tells you the wheel size only if you read it correctly.
Then check profile. Wheels have different outer lip shapes. Some are flat, some are stepped. A cover built for a flat lip will not grip a stepped one securely.
Finally, match the design. Wheel skins and full covers are not interchangeable. A skin wraps the existing wheel face. A full cover replaces the whole face. Using the wrong type on the wrong wheel leaves gaps.
| Check | What to Look At | Why It Matters |
|---|---|---|
| Diameter | Outer rim edge, not tire | Wrong size will not seat |
| Profile | Outer lip shape | Affects clip grip |
| Wheel type | Steel vs alloy | Changes retention design |
| Cover type | Skin vs full cover | Determines coverage |
How to Measure a Wheel for a Wheel Cover Before You Order
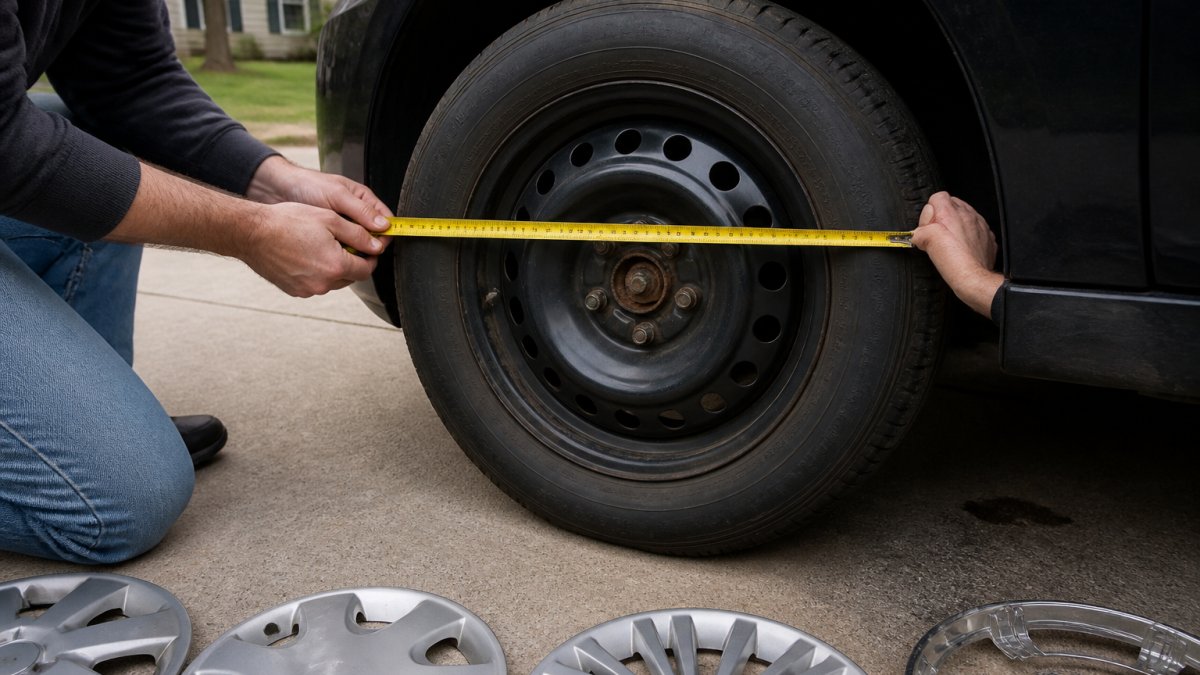
Measuring a wheel for a wheel cover takes about five minutes and a tape measure, but diameter alone is not a compatibility check. Diameter gets you in the size class. Bolt pattern, clip layout, and backspacing decide whether the cover actually stays on. Work through all four before you order.
Step 1: Measure the outer rim diameter
Park on flat ground, set the parking brake, and remove the old cover if one is still attached. Hook the tape on the outer rim lip at the widest point and read straight across to the opposite lip. Measure the metal rim edge only, not the tire, and not the sidewall bulge. Round to the nearest inch, since covers are sold in whole-inch sizes.
Step 2: Identify the wheel type and profile
Note whether the wheel is steel or alloy, and look at the outer lip shape. Flat lips, stepped lips, and rolled lips each grip a cover differently. A cover built for a flat lip will not seat on a stepped one, no matter how close the diameter is.
Step 3: Count the bolt pattern (lug layout)
Count the number of lug nuts and measure the distance between them. The common layouts are 4-lug, 5-lug, and 6-lug, and the spacing differs even within the same lug count. A cover designed around a 5-lug layout with one spacing will not sit centered on a 5-lug wheel with a different spacing. This is the check most buyers skip, and it is the one that produces the off-center wobble people blame on clips.
Step 4: Check clip contact points and backspacing
Look at where the factory cover's clips contacted the rim. On a bare wheel, you can often see small wear marks at those points. A replacement cover's clips need to reach those same spots. Backspacing, how far the wheel face sits inboard or outboard relative to the tire, also matters, because a cover that protrudes past the tire's outer plane is more exposed to curb strikes and more likely to catch air at speed.
Step 5: Confirm the model year and trim
Wheel design changes within a generation. Two model years of the same vehicle can share a body style but use different wheels, and trim levels (base versus sport) frequently differ. Confirm the cover is listed for your exact year and trim, not just your model name.
| Check | What to Look At | Why It Matters |
|---|---|---|
| Diameter | Outer rim edge, not tire | Wrong size will not seat |
| Profile | Outer lip shape | Affects clip grip |
| Wheel type | Steel vs alloy | Changes retention design |
| Bolt pattern | Lug count and spacing | Off-center wobble if mismatched |
| Clip points | Wear marks on rim | Clips must reach the same spots |
| Backspacing | Wheel face vs tire plane | Protrusion and curb exposure |
| Year and trim | Exact model-year listing | Mid-generation wheel changes |
If your diameter measurement lands between sizes, size down only if the cover's clip design is adjustable. Otherwise, confirm the exact fit with the seller before ordering.
Wheel Cover Retention Clips and Attachment Design Risks
Wheel cover retention clips are the small metal or plastic tabs that grip the wheel and hold the cover in place. Retention is where most aftermarket covers fail, because clip design varies widely and not every clip style suits every wheel.
Reinforced clips hold better than thin wire clips, but they also need a wheel lip that gives them something to bite. On a worn or slightly bent rim, even good clips can slip.
Attachment designs fall into a few groups:
- Wire ring clips. Common and cheap. They grip the rim lip and flex to fit. They loosen over time.
- Reinforced steel clips. Stronger hold, better for rough roads. They can scratch alloy wheels if misaligned.
- Bolt-on or screw-on designs. Most secure, but they need specific mounting points on the wheel.
- Snap-in plastic tabs. Light duty. Best for low-speed, low-vibration use.
The retention risk is highest when a cover's clips do not match the wheel's lip depth. A clip that is too short never fully engages. A clip that is too long holds the cover off the wheel face and creates a gap.
Wheel Cover Clearance and Valve Stem Compatibility Checks
Clearance and valve stem compatibility decide whether a cover interferes with the parts it sits near. A cover that clears the valve stem and brake hardware sits quietly. One that does not will rub, trap air, or block access.
Check these clearance points before you commit:
- Valve stem position. The cover's cutout must line up with the stem so you can check tire pressure.
- Valve cap access. You need room to remove and refit the cap without pulling the cover.
- Brake caliper clearance. Some covers sit too close to calipers on certain wheels and rub under load.
- Wheel weights. Balance weights on the rim edge can block a cover from seating flat.
Valve access is the one people forget. If the cover blocks the stem, you cannot inflate the tire without removing the cover first. That turns a simple pressure check into a chore.
Wheel Covers vs Replacement Rims: Pros, Cons, and When to Switch
Wheel covers and replacement rims solve different problems. Covers restore appearance at low cost. Rims fix structural damage or change the wheel's actual size and offset.
Wheel covers: pros and cons
- Pros: Low cost, easy to swap, no tire remount, wide style choice, fast to replace.
- Cons: Can loosen, limited to the wheel you have, not a fix for a bent rim.
Replacement rims: pros and cons
- Pros: Fix structural damage, allow size or offset changes, no clips to fail.
- Cons: Higher cost, require tire remount and balance, more involved to install.
Switch to replacement rims when the wheel itself is damaged, cracked, or bent. Stay with covers when the wheel is sound and you only need to restore the look or replace a lost cover.
Wheel and Tire Protection: What Covers Help and Hurt
Wheel covers offer limited protection, and it is worth being honest about what they can and cannot do. A cover shields the wheel face from curb rash and road debris. That is the main benefit.
What covers do not do:
- They do not protect the tire sidewall from curb damage.
- They do not stop pothole damage to the rim.
- They do not fix an already-bent wheel.
A loose cover can actually cause harm. If it shifts at speed, it can scuff the wheel face or fly off and hit another vehicle. That is why retention checks matter as much as appearance.
For tire protection, covers do nothing. Tire sidewall damage comes from curbs, potholes, and road hazards, and a cover sits inside that zone, not over it. If sidewall protection is your goal, covers are the wrong tool.
Troubleshooting Loose Covers, Noise, and Sensor Interference After Install
Troubleshooting after installation starts with three symptoms: looseness, noise, and interference. Each points to a specific cause, and each has a fix you can try before returning the cover. But symptoms alone are not enough. You need a repeatable inspection you can run at install, after the first drive, and again after a tire rotation.
The post-install inspection procedure
Run this check every time a cover goes on:
- Grip test. With the wheel cool, grab the cover at the 12 o'clock and 6 o'clock positions and try to rock it. It should not move more than a hair. Repeat at 3 and 9 o'clock.
- Clip engagement. Press each clip point and listen for a click or feel for a firm seat. A clip that never engages is a clip that will release at speed.
- Spin check. With the wheel off the ground (or on a lift), spin it by hand and listen. Any tick, scrape, or rub means contact with a wheel weight, the caliper, or the rim edge.
- Protrusion check. Sight along the tire's outer sidewall plane. The cover should sit flush or slightly inboard. If it protrudes past the tire, it is exposed to curb strikes and airflow that can lift an edge.
- Valve access check. Confirm you can reach the valve stem and remove the cap without pulling the cover.
- Road test. Drive at low speed first, then at highway speed, and listen for new noise or vibration. Re-run the grip test after the first drive, clips that were marginal at install often loosen once the wheel heat-cycles.
Symptom-by-symptom fixes
- Loose cover. Usually a clip that is not fully engaged or the wrong diameter. Re-seat the cover and press each clip until it clicks. If it still moves, the size or bolt pattern is off.
- Rattling or humming noise. Often a cover that is not seated flat or is contacting a wheel weight. Remove it, check the seating surface, and refit. If the noise returns, look for a bent rim lip.
- Rub marks. A sign of clearance problems with the caliper or rim edge. Inspect the contact point and adjust alignment. Persistent rub marks mean the cover and wheel are not compatible.
- Gaps at the edge. Usually a profile mismatch, flat-lip cover on a stepped-lip wheel, or the reverse. No amount of re-seating fixes a profile mismatch.
- Difficult valve access. The cutout is not aligned. Rotate the cover until the cutout lines up with the stem, then re-seat the clips.
Sensor and vehicle-system interference
Tire-pressure monitoring sensors sit at or near the valve stem on most modern vehicles. A cover that blocks, presses on, or forces the stem sideways can interfere with sensor readings. Keep the cutout aligned and never force a cover over the stem. If your pressure warning light behaves oddly right after a cover install, remove the cover and check the stem before assuming the sensor failed.
Wheel-speed sensing is a different system. On most vehicles it reads at the hub or axle, not at the cover, so a properly seated cover does not affect it. Be skeptical of claims that a wheel cover interferes with anti-lock braking or traction control, those systems read at the hub, and a cover that clears the caliper and sits flush is not in that signal path. The plausible interference risks are valve-stem access, TPMS stem hardware, and physical contact with brake or suspension components.
When to remove the cover
Stop driving on the cover and remove it if any of these are true:
- It moves more than a hair after a correct install.
- It rubs the caliper, a brake line, or a wheel weight.
- It protrudes past the tire's outer plane.
- It blocks or presses on the valve stem.
- A clip is broken, bent, or missing.
If a cover keeps coming loose after correct installation, the wheel and cover are not compatible. That is the point to stop forcing it and confirm the fit.
Tire and wheel safety information from NHTSA
Conclusion: Lowering Aftermarket Wheel Cover Compatibility Risks
The challenge with aftermarket covers is that fit is never guaranteed by the listing alone. Diameter, profile, clip design, and clearance all have to line up, and one mismatch is enough to send a cover flying. Measure the rim, match the profile, and check the valve stem before you order.
At WheelCovers.Com, we stock over 1 million hubcaps, wheel covers, wheel skins, and trim rings, and we have been family owned since 1979. Our online catalog makes it easy to find original and custom covers by vehicle, so you skip the salvage yard search. Nationwide shipping brings the right fit to your door.
Get started with WheelCovers.Com and find a cover built for your exact wheel.
Frequently Asked Questions
How do I know if an aftermarket wheel cover will fit my car?
Match the wheel's outside diameter, profile, and attachment style. Measure the outer edge of the steel wheel with the tire mounted, then check whether the cover uses clips, a snap ring, or bolts. Confirm valve stem position and clearance before ordering. A vehicle-specific fit listing beats a universal claim, because wheel cover compatibility depends on the exact wheel, not just the model year.
Can the wrong-size wheel cover damage a wheel?
Yes. A cover that is too small can bend retention clips and scratch the rim lip, while one that is too large can rub the tire sidewall or sit loose and fly off at speed. Repeated removal of a poorly fitting cover also wears the clip seats. Measuring with a wheel cover size guide and checking clearance prevents most of this damage before it starts.
Can aftermarket wheel covers interfere with tire valves or sensors?
They can. A cover that blocks the valve stem makes it hard to check or add air, and designs that sit too close to the valve can contact a tire pressure sensor housing. Check wheel cover clearance and valve stem compatibility first: the valve should stay accessible, and the cover should not press on the stem or sensor area at any point around the wheel.
How can I tell whether a wheel cover is securely attached?
After installation, grip the cover at several points and try to rock it. It should not shift, click, or lift at the edge. Spin the wheel by hand and listen for rubbing. Check retention clips for even seating and full engagement. Recheck after the first few drives, since vibration and potholes can loosen a cover that seemed tight in the driveway.